Saturday 30 May 2015

An apron for a birthday present


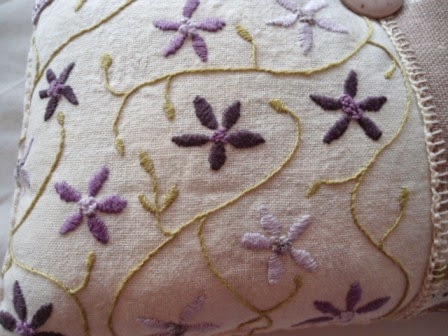
I raided my various stashes for this apron. The main body of the apron is made from a linen tablecloth, the edge, of which, I used to create the hem. The sides were just folded over and stitched. For the band and ties I used vintage fabric with a 70s design. To create the pocket I used a flower-shaped placemat that I attached to the apron by sewing a rectangle on three sides. This means that the actual pocket is a normal pocket shape and size. I attached a vintage button to each end of the opening to strengthen them.

 The placemat was part of a fabulous find from Ebay. There were more placemats, coasters and tablemats all in the same design, each one hand-embroidered, along with a whole pile of other table linens. I like to know that someone else's hard work has been reused and not stuffed in a cupboard, forgotten.

TTFN
Louise

Thursday 28 May 2015

Brooches


I'm busily trying to make things to sell for a fair I'm doing in early June and these are three of the brooches that I've made for it.

This first one is made from a scrap from a damaged tablecloth, vintage fabric, lace and buttons. The embroidered scrap is edged in blanket stitch and the whole brooch is edged in buttonhole lace. A felt flower finishes it off.


This circular brooch is made from a selection of vintage fabrics, some vintage tatting and a button. The bow is covered in running stitch and bound in the middle using a scrap of tablecloth edge. The brooch is edged in buttonhole lace.


This brooch is made from another embroidered scrap from the same damaged tablecloth as the first brooch. This is mounted onto vintage linen and decorated with lace scraps and vintage buttons. The brooch is edged in blanket stitch.


TTFN
Louise

Saturday 23 May 2015

Rose pillow


This pillow is made from a patch of pink and cream linen and cotton fabrics. The largest is cream linen that is covered in hand embroidered flowers and stems (it's something I embroidered many years ago). To the right of this a piece of cream and dusky pink Ian Mankin linen has been joined to the embroidered fabric with buttonhole lace. This piece of fabric is also decorated with three wrapped threads that are topped and tailed with french knots, with the addition of a bullion loop at the bottom of each wrapped thread. Across the top of the pillow there is a section of drawn threadwork taken from a vintage cotton napkin. The join between this fabric and those on the bottom is edged with lavender lace.

The pillow is backed with cream cotton from a damaged vintage tablecloth and has been stuffed with dried rose petals and  synthetic stuffing. Rose pillow and Elsie May and Bertha labels have been added to the bottom of the right-hand seam. Once stuffed the pillow has been edged in running stitch. A dusky pink porcelain button has been hand-tied onto the pillow where the three fabrics meet.

TTFN
Louise

P.S. You can buy this pillow here.

Thursday 21 May 2015

Button flower brooch


This organic oval brooch has been made from lace fabric that I have created myself from muslin and scraps of lace and silk and free motion embroidery. I then embellished this with chain stitch stems, each ending in either a mother of pearl button or a small bead. Around the edges of the floweres I used french knots and a variegated blue embroidery thread to create a 'sky' and a cluster of yellow french knots to depict the 'sun'. Along the base of the brooch I used the same green embroidery threads that I used for the flower stems to create a bed of french knots.

The back of the brooch is made from white felt and has a kilt-style pin to attach the brooch to your clothes and an Elsie May and Bertha label. To complete the brooch the edges have been bound with blanket stitch.

If you'd like to the proud owner of this unique brooch, pop over to the Elsie May and Bertha website.
TTFN
Louise

Tuesday 19 May 2015

A blue lavender pillow


The top of this pillow is made from thick cotton fabric that has a greige (think dark cream with a touch of grey) background with airforce blue printed images. This has then been embellished with an image of an Edwardian lady dressed in the same colour blue as the fabric, with a background of bronze with white flowers. This has been edged in blue pekinese stitch. Underneath the image there is some vintage cream lace and to the side of it a thin strip of blue fabric with bullion loops down one edge and stab stitches down the other. Where the two different background fabrics meet there's a line of buttonhole lace and a row of prairie points in the same blue fabric as the narrow strip. On the righthand half of the pillow there's a circle of tatting and then another line of the vintage cream lace.

The pillow has been backed with beige cotton and then filled with dried lavender petals and synthetic stuffing. In the right-hand side seam there are two labels, one says lavender pillow, the other has the Elsie May and Bertha logo. Once stuffed the pillow was edged with running stitch, a bead was hand tied onto the hat of the lady in the image and a vintage button was tied at the bottom right corner.

The pillow measure 10cm tall x 27cm wide x 6cm deep (approx).

You can now buy this pillow from the Elsie May and Bertha website here www.elsiemayandbertha.co.uk/Blue-lavender-pillow.

TTFN
Louise

Friday 15 May 2015

Reinventing the page 5 - design sheets 1 and 3

Although the course has now ended, there's still so many things that I can relating both to what I've learnt and the designs I've created. 

I've bought myself an A3 ledger (a bargain from Wilko at £4, it's not very thick paper, but it's perfect to mount my work on to and has a lovely texture), and have started to mount my design sheets into it.

The photos below are of design sheet 1 and the pictures that I used for inspiration.


The picture below is of a section of design sheet 1 in different colours.


I've started a third design sheet, which is based around two circular books that have been mounted directly onto the ledger page. Further work will be done by adding doodles straight onto the ledger page too.


The last three images above are of a blank circular book (they're really easy to make, you just need to cut out your 'pages' in card or paper then sewing them together down the centre, and you have a book!). At the moment, I have only doodles on the front cover of the book and the half circle on the page.


The book in these last images has been made from card that has had the multicolour version of a section of design sheet 1 (see the 5th image from the top of the page) printed onto it.  That means that this books has a mixture of blank and patterned pages.

I'll keep adding doodles to the pages in both of these books until they're full, and they'll be a collection of inspirational images that I can peek at when I've not an idea of what to do!

TTFN
Louise